To access your customer area at ICTEA, visit:
Up to the right you see a drop-down menu "Account". Select on it 'Login'.
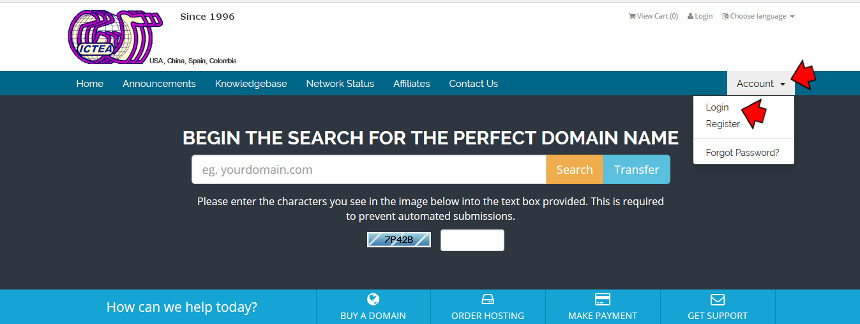
The following page will appear:
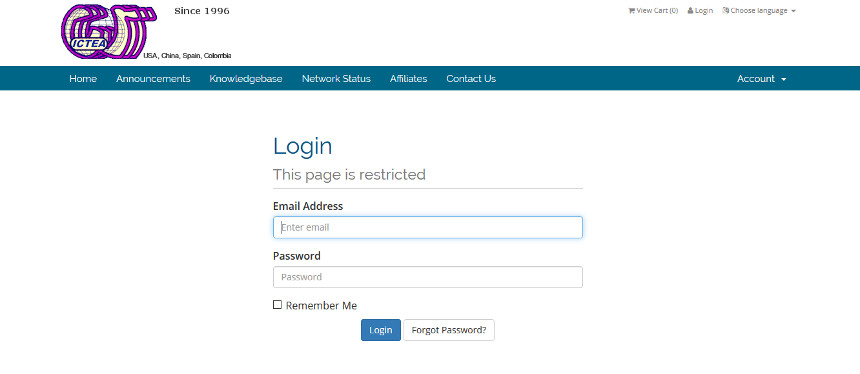
If you have forgotten your password, click on: "Forgot Password?" and the following page will appear:
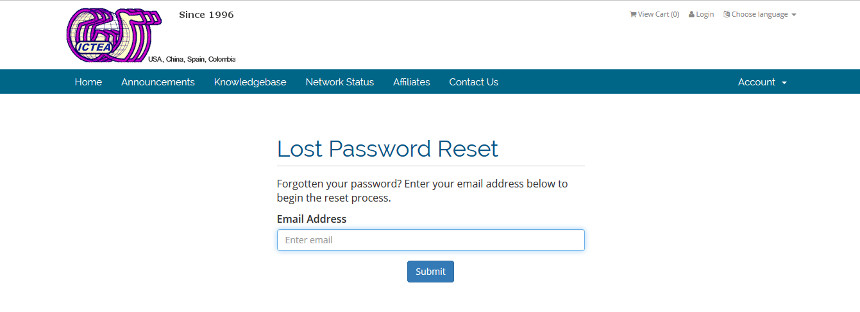
Enter in the box the email address where you get the emails from ICTEA and ICTEA will send an email with a link to reset the password. Follow the instructions.
Once in your client area you will see a summary page of the account as shown below.
At the top of the page you see (after clicking on 'Notifications') if there is any pending invoice (also at the center of this page).
Besides the top menu, there is a column to the right with additional information and direct links. In the first block 'Your info' there is a button to update the account data (it is VERY IMPORTANT to keep updated the email address):

At the center of the home page you see a list of pending invoices (if any) or Products/Services (if any). You will be also able to pat for any pending invoice or to contrac a new Product/Service.
You will also see if there is any opened support ticket and if so, click on any to see it, update it or close it. You can also open a new support ticket.
Also, there is a box to Register/Transfer a domain name.

If any staff member have uploaded any file or document, you can download, you see them at this home page in the block (Attached Files). Click on any to download it.
You will also see your Affiliate information or the Recent News.

If in the Account Home Page you click on (upper side) 'Your info > Update' a page appears showing the current ones. Modify any you need and click on the button below 'Save Changes' to keep them updated.
We stress the importance of being updated the Email Address as it is the means we use to communicate with you, where the password reset email is sent, etc.
In this page "My Details" we see to the left links to: Contacts/Sub-Accounts, Change Password, Security Settings and Email History.

If in this page "My Details" we click on the link 'Contacts/Sub-Accounts', a page as the one shown below appears:
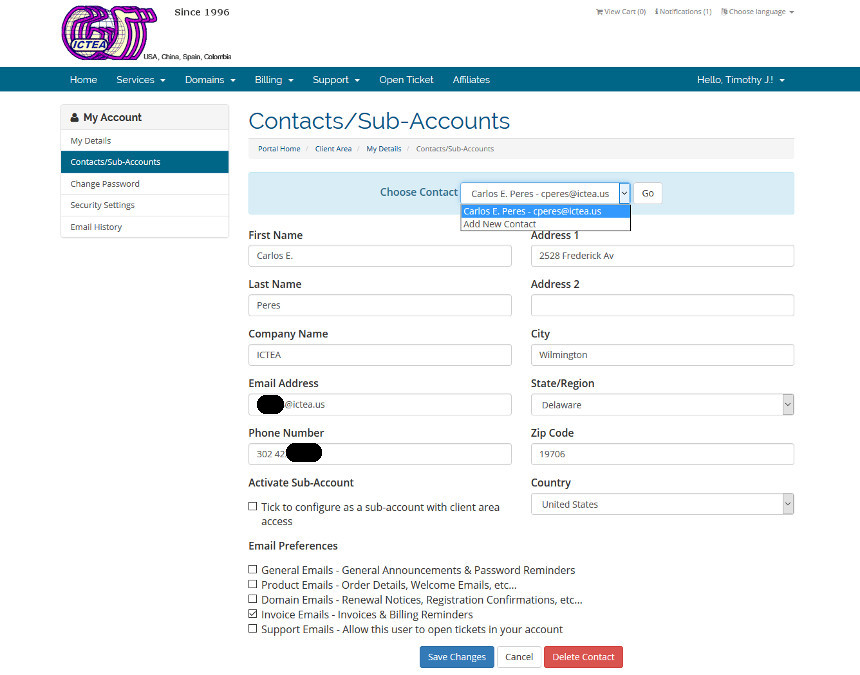
At the top, a drop-down menu allows to select a contact to See/Edit, or to create a new one and if you want it to have access to the client area, and which mails to receive from the system (billing, support, etc.), for instance, you can create a contact to receive only bills.
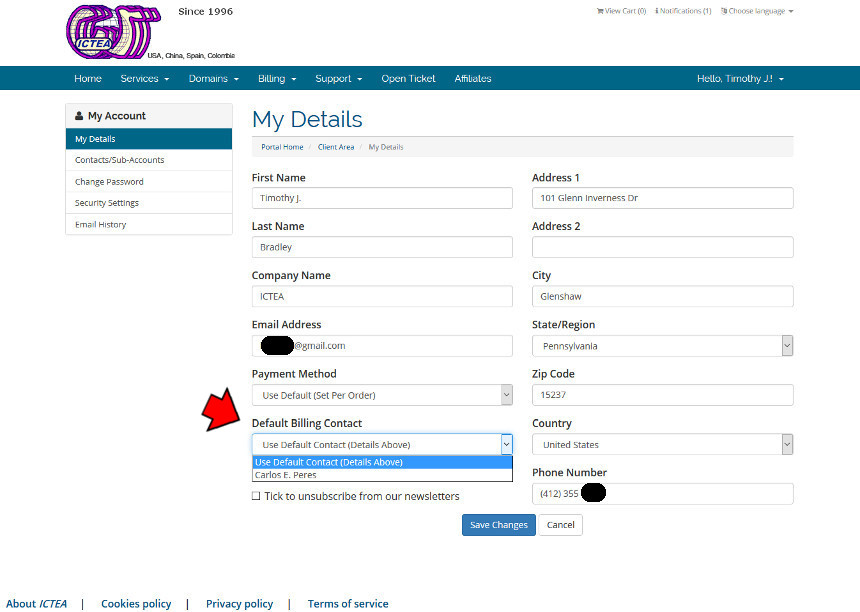
3.1.1 - Default Billing Contact.-
We want to create a contact to receive only invoices, so as indicated above we will create a new contact, aan in "Email Preferences" we tick only the box "Invoice Emails", so, besides the main contact, this new contact will also receive emails about invoices.
Now, we go to the page "My Details", we select from the drop-down menu "Default Billing Contact" this new contact. With the new contact selected we click on the button below "Save Changes".
3.1.2 - All Privileges Sub-Account.-
To create a sub-accoun having all of the privileges as you, then go to the page "Contacts/Sub-Accouts" and from the drop-down menu select the wished contact, then tick the box 'Tick to configure as a sub-account with client area access' allowing to log in the client area with its email address and the account password. Also tick all the boxes 'Email Preferences'.
Other options of the links in the left column are:
3.2.- Change Password.-
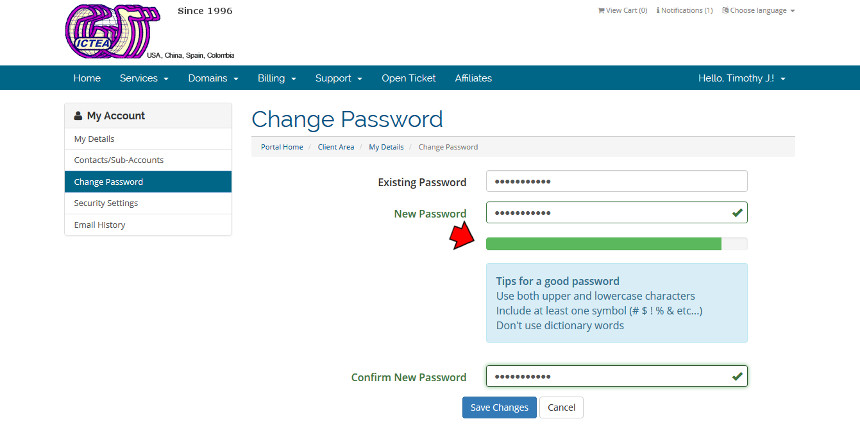
This page allows to change the password to log in the 'Client Area'.
Enter in the first box the current password and in the second box enter the new password. Enter again the new password in the third box to confirm.
A strength indicator (as indicated by the arrow) indicates the strength of the new password. Also, you see tips on how to create a good password.
The page "Security Settings" allows to Change the Security Question, question whose answer we will be required to reset our password.


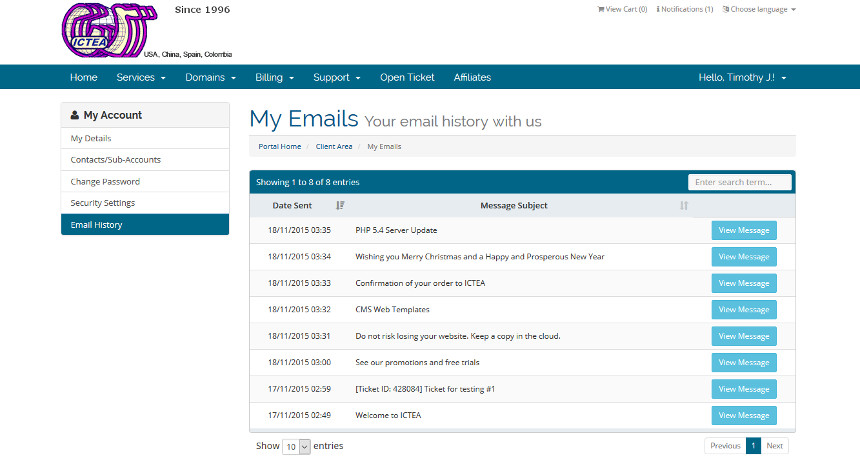
The page "Email History" shows a list of the emails we have sent to you, the date of sending and its subject.
Let now see the options in top menu.
Click on the second item from the top menu (Products/Services), a drop-down menu will appear:

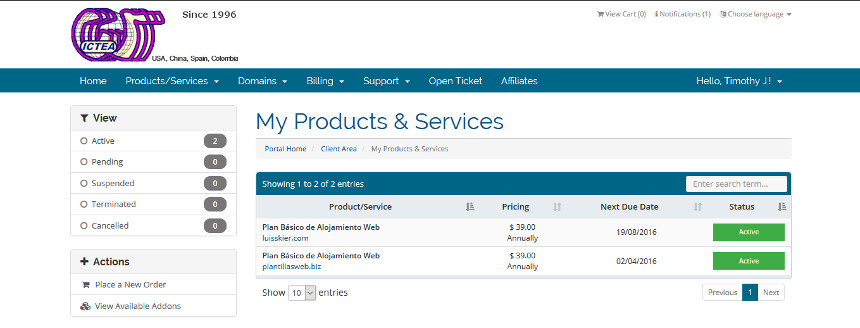
In this drop-down menu click on the first link (My Products/Services) a page appears showing a list with the ones you have and the status.
Clicking on any, we go to a page with additional information, as shown in the image below (we have clicked on 'Plan Básico de Alojamiento Web' for 'luisskier.com').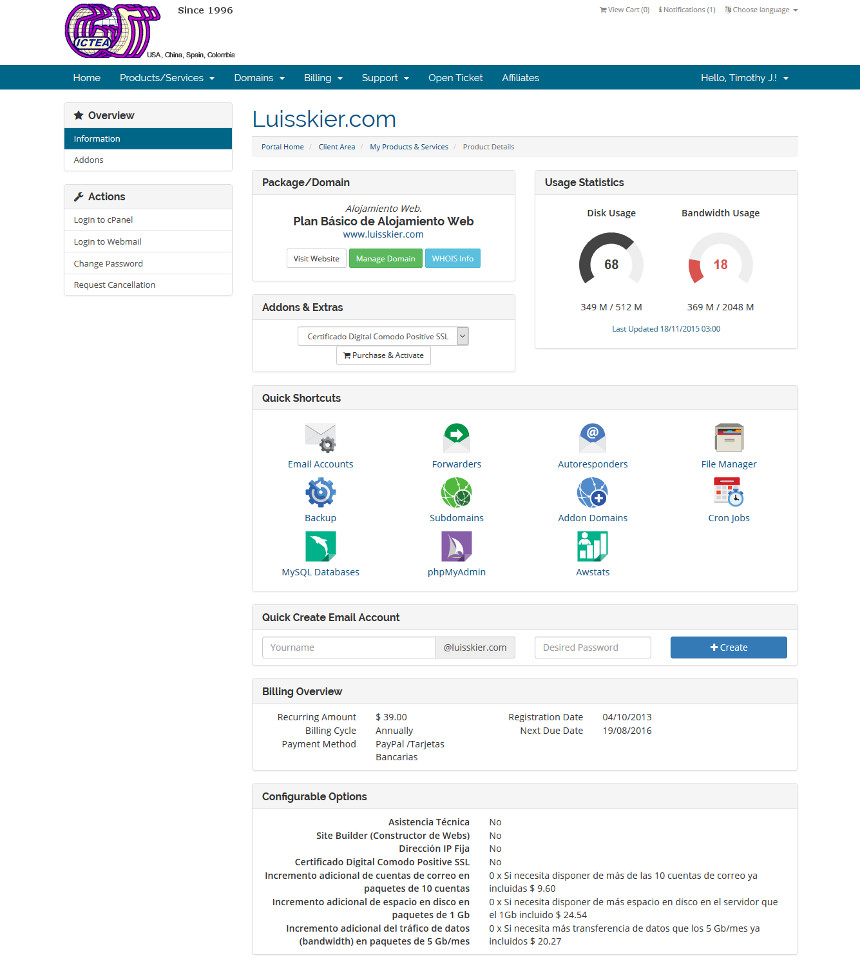
At the top, in the block 'Package/Domain', there are buttons 'Visit Website', 'Manage Domain' (what we deal with later in 'Domains') and to see its 'WHOIS Info'.
At the rigt block 'Usage Statistics' see 'Disc Usage' and also 'Bandwidth Usage'.
See at the block 'Quick Shortcuts' a series of icons allowing to get access to the server to perform the specified actions.
At the next block we can create an 'Email Account'.
Then we see a 'Billing Overview' and the 'Configurable Options' for the product/service.
At the left column there are two blocks: 'Overview' and 'Actions'. The links in this block 'Actions' are explained below.
Clicking on the link 'Login to cPanel', you log in the server panel to perform any action as create/delete an email account.
Click on the link 'Login to cPanel' and the server panel will appear as shown below: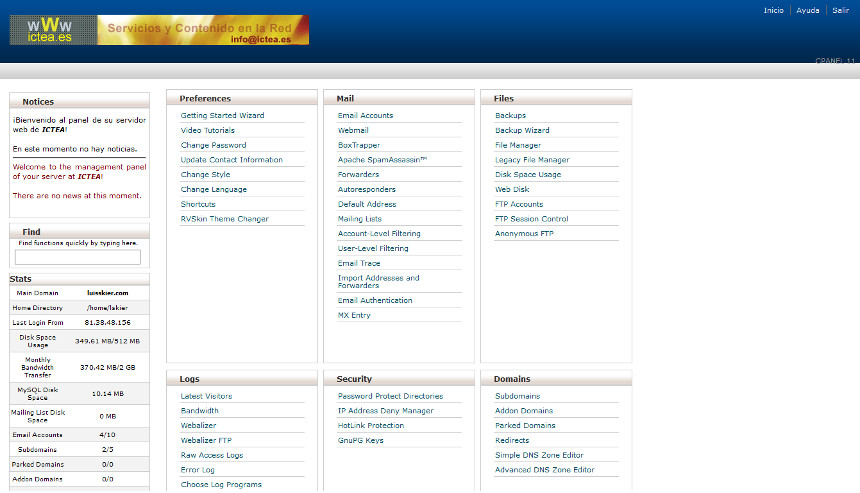
Clicking on the link 'Login to Webmail', you access to webmail to manage (read/send) any email, what you can do from any computer connected to Internet (very useful when out from the office).
Click on the link 'Login to Webmail' appearing a page to log in it as shown below: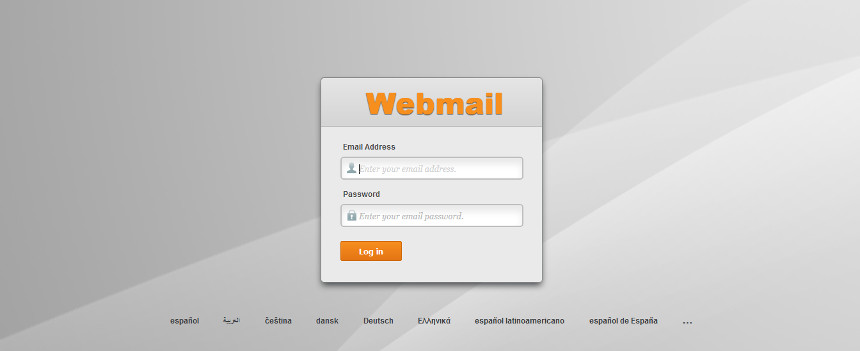
At this page we can change the password to log in the 'Server Panel'. (VERY IMPORTANT.- DO not confuse with change password to log to the 'Client Area' as explained in 3.2).
Enter in the first box the current password and in the second box enter the new password. Enter again the new password in the third box to confirm.
A strength indicator (as indicated by the arrow) indicates the strength of the new password. Also, you see tips on how to create a good password.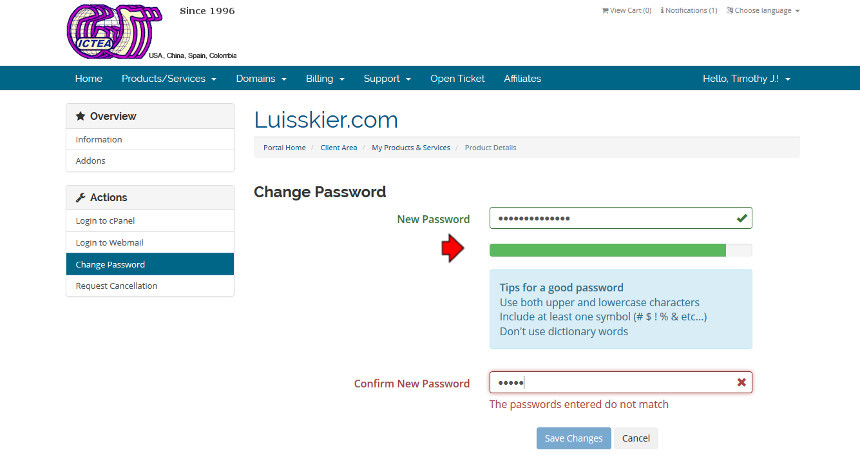
4.1.4.- Request Cancellation.-
For the Product/Service click on the link 'Request Cancellation' appearing a page as below where we can request its cancellation.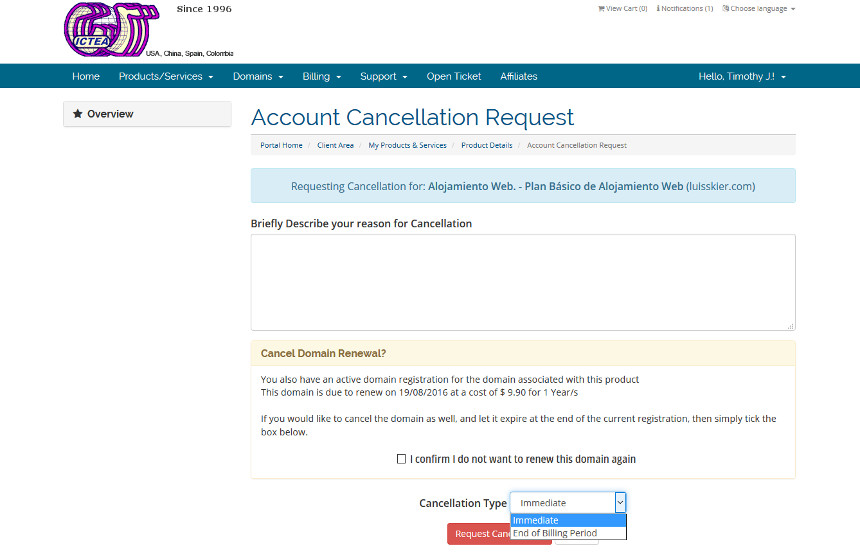
In this page, a textbox asks about the reason for cancellation, and a drop-down menu below (Cancellation Type) allows to select if the cancellation should be done immediaately or at the end of the billing period. Also there is a box to tick if we do not want to renew the associated domain name.
4.2.- Order New Product/Service.-
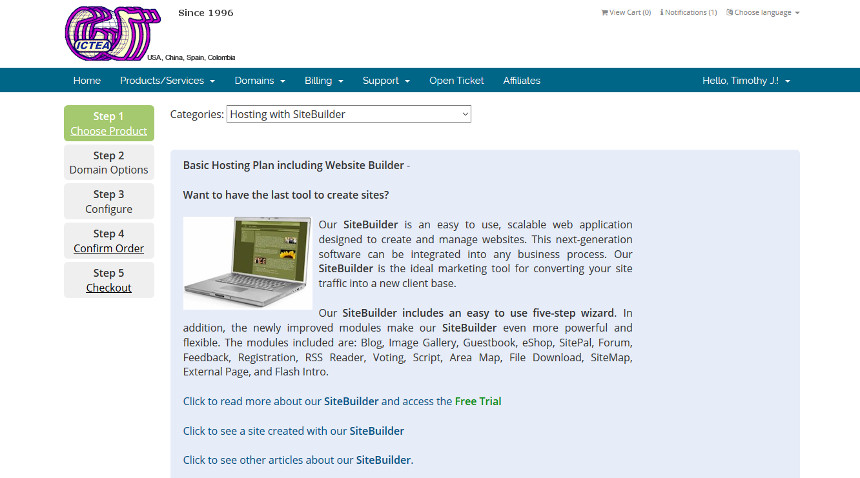
Clicking on the second item from the top menu (Products/Services), a drop-down menu appears. If we select the second item 'Order New Product/Service' you go to the webshop to purchase any:
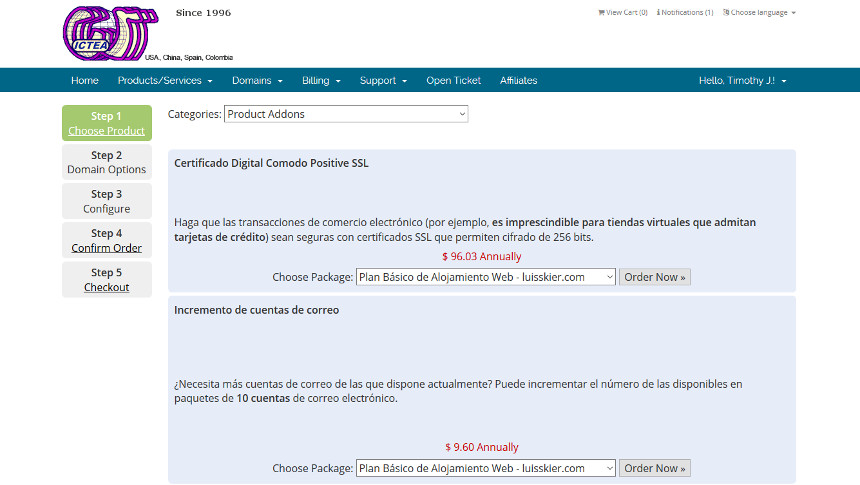
Clicking on the second item from the top menu (Products/Services) (preferably with the product/service selected), a drop-down menu appears. If we select the third item: 'View Available Addons', we can view and purchase the add-ons available for the products/services we have (if we had selected a particular product/service, only the addons applicable are shown).
Click on the third item from the top menu (Domains), a drop-down menu will appear:

In this drop-down menu click on the first link (My Domains), and a page appears showing a list with the domains you have registered with us, the registration and due dates, the renewal price and the status.
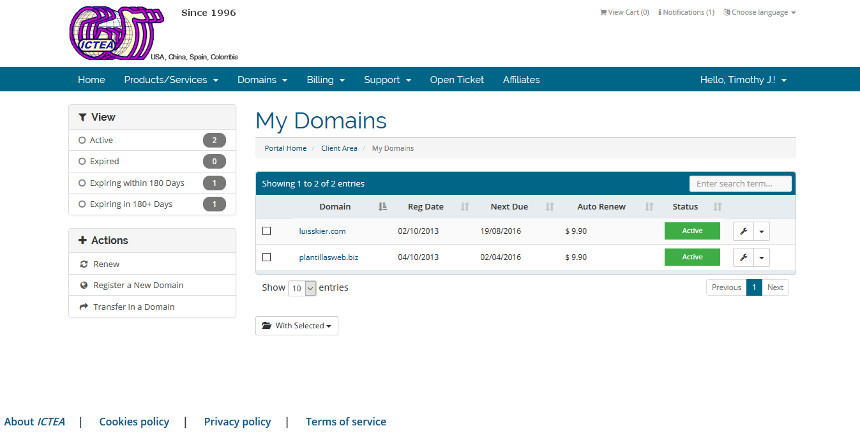
Clicking on any domain a page (as shown below) appears with additional information on the domain and links to manage it.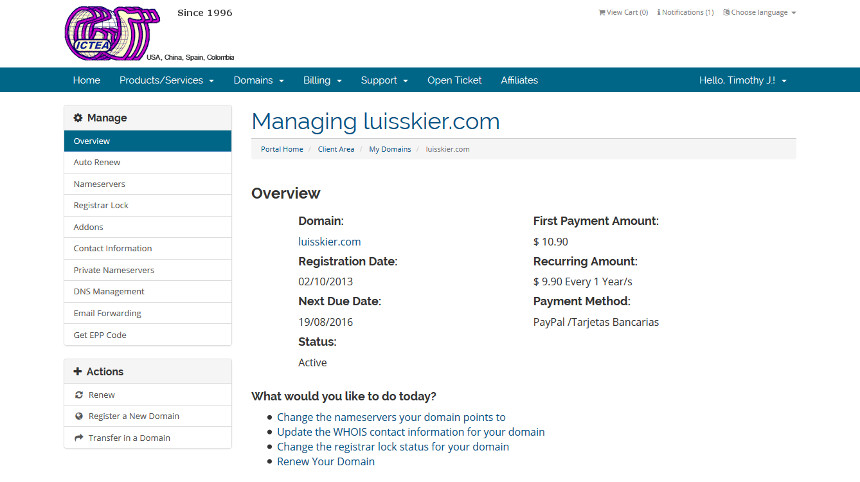
Also, if at the page 'My Domains' we select any action shown in the drop-down menu which appears after clicking to the right of the icon resembling a wrench, for any domain.
These actions are explained below.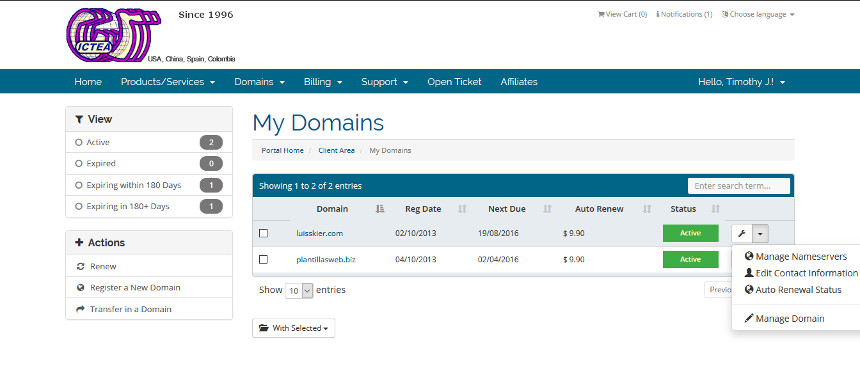
5.1.1.- Manage Nameservers (DNSs).-
Name servers are the names of the computers (servers) where your domain is. To read more about the name server system (DNSs), click HERE.
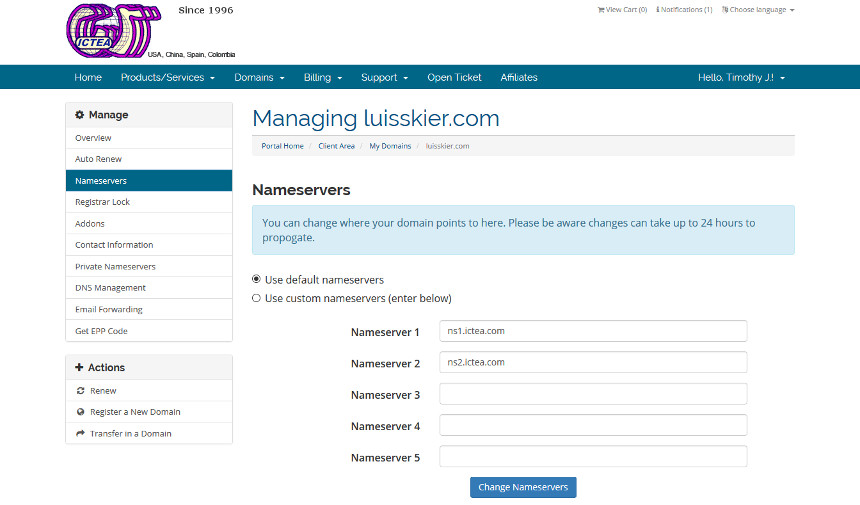
To go to the management page click on 'Manage Nameservers'.
By default, the box 'Use default nameservers' is ticked. That is, our nameservers are used so, your domain will be hosted by ICTEA.
But if your domain is going to be hosted in a server other than of 'ICTEA', then you should tick 'Use custom nameservers' and enter (up to five) their names instead of the ones shown: ns1.ictea.com y ns2.ictea.com (if you do not know the names, contact your web hosting company).
5.1.2.- Contact Information.-
Log in the 'Client Area' and go to Domains >> My Domains and click on the one you wish, or click in the drop-down menu which appears after clicking to the right of the icon resembling a wrench, for any domain.
Or, in the first case, in the page which appears (Managing domain.com), click on the link below 'Update the WHOIS contact information for your domain'.
A page appears with information of the contacts, 'Registrant', 'Administrative' and 'Technical', where you can modify any you wish.

5.1.3.- Registrar Lock.-
We log in the 'Client Area' and we go to Domains >> My Domains and we click on the one you wish.
In the page which appears, click on the link below 'Change the registrar lock status for your domain'. See also 5.1).
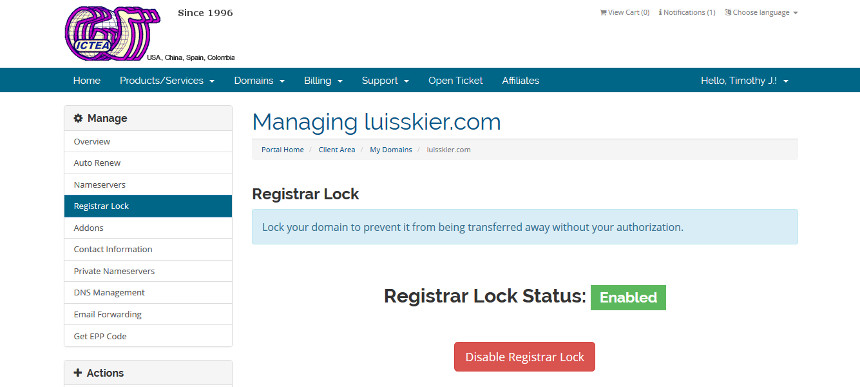
A page (as shown below) appears allowing to enable/disable the locking in the registrar to transfer the domain.
We recommend having the domain locked at the registrar, so to avoid a possible unwanted transfer.
5.1.4.- Renew Domains.-
We log in the 'Client Area' and we go to Domains >> My Domains and we click on the one you wish.
In the page which appears (Managing domain.com), click on the link below (Renew your domain. See also 5.1).
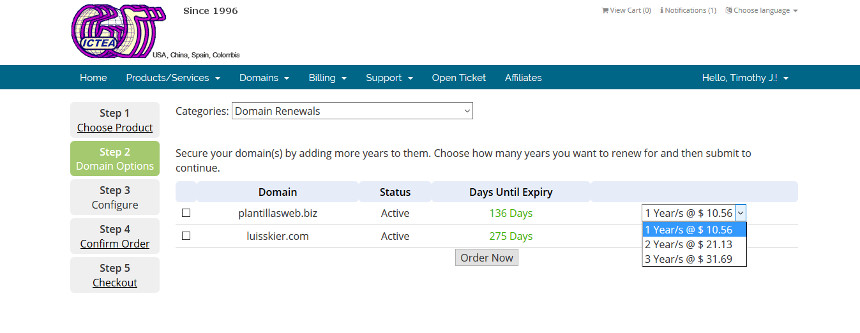
Or, directly, after logging in the client area go to Domains >> Renew Domains.
A page, as shown below appears, allowing to renew any domain you have registered with us.
To renew any tick the box to the left, select the renewal period and click the button 'Order Now'.
5.1.5.- Register a New Domain.-
We log in the 'Client Area' and we go to Domains >> Register a New Domain.
A page as shown below appears with 'Register' already selected where a new domain name can be registered. For doing a registration follow the instructions.
It is recommeded, at the proper step, to tick the boxes 'DNS Management' and 'Email Forwarding' as these options are free and could be needed.
Once the registration is done, the new domain appears in the list 'My Domains'.

5.1.6.- Transfer Domains to Us.-
We log in the 'Client Area' and we go to Domains >> Transfer Domains to Us.
A page as shown below appears with 'Transfer' already selected where domain name can be transferred. For doing a transfer follow the instructions.
It is recommeded, at the proper step, to tick the boxes 'DNS Management' and 'Email Forwarding' as these options are free and could be needed.
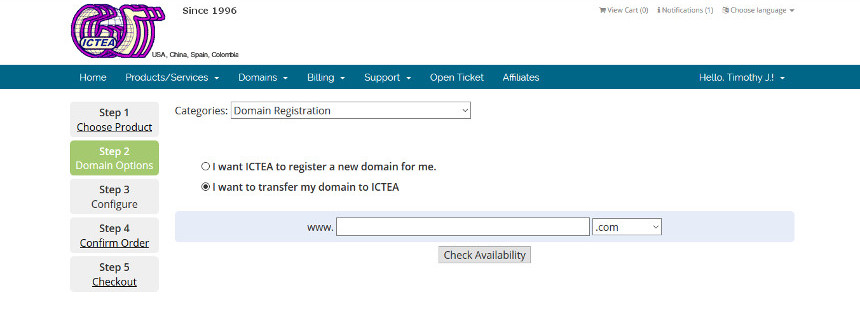
(VERY IMPORTANT.- To complete the transfer successfuly, the domain should be 'Unlocked for transfer' at the current registrar and have the code 'EPP' authorizing this).
To know more about the 'Transfer of a domain' click HERE.
Once the transfer finishes successfully, the domain will appear in the list 'My Domains'.
5.1.7.- Domain Search.-
We log in the 'Client Area' and we go to Domains >> Domain Search.
A page as shown below appears where a new domain name can be registered. For doing a registration follow the instructions.
It is recommeded, at the proper step, to tick the boxes 'DNS Management' and 'Email Forwarding' as these options are free and could be needed.
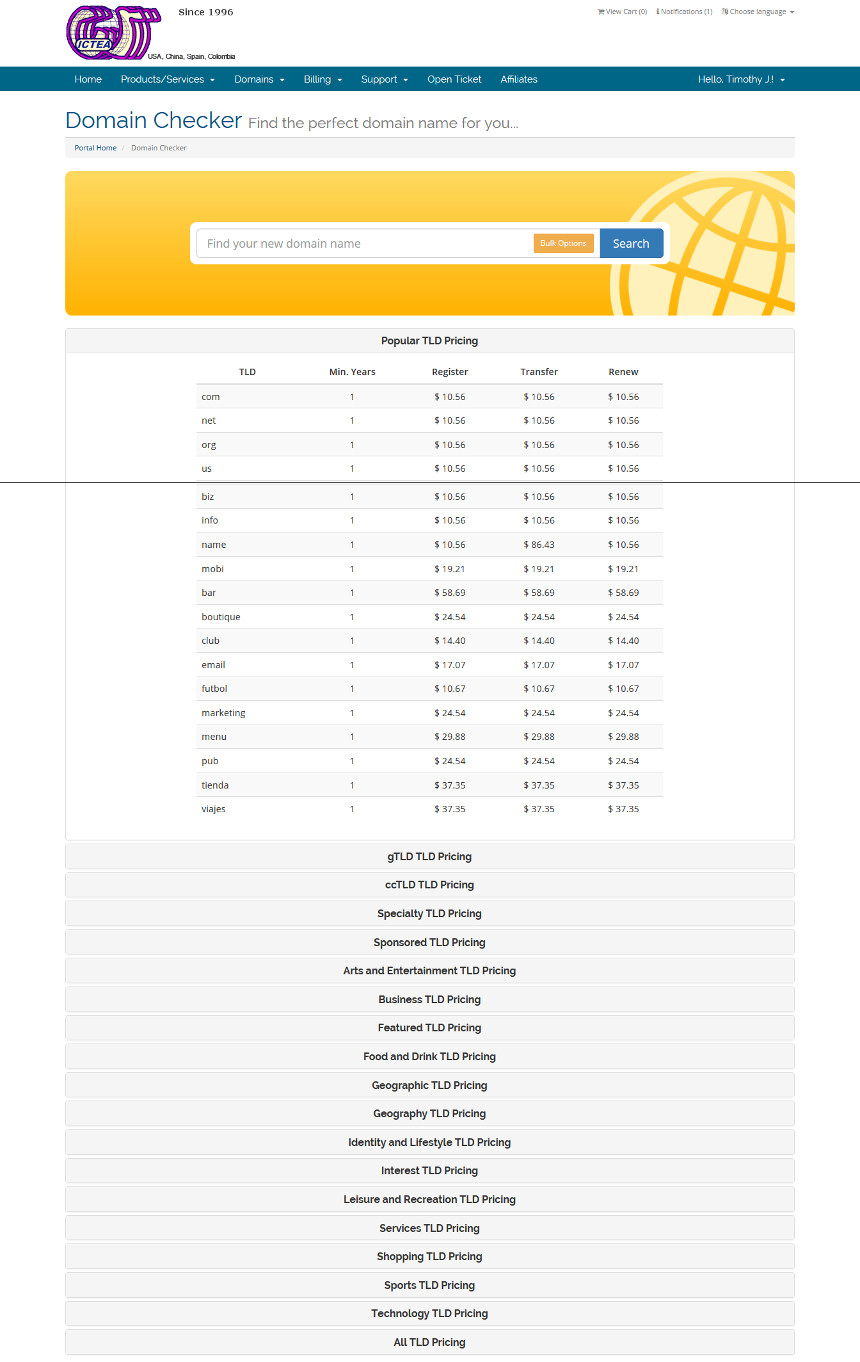
See in this page the registration prices for different TLDs.
5.2.- Other managements of a domain.-
Click on the third item from the top menu (Domains), a drop-down menu will appear:

In this drop-down menu click on the first link (My Domains), and a page appears showing a list with the domains you have registered with us, the registration and due dates, the renewal price and the status.

Clicking on any domain a page (as shown below) appears with additional information on the domain and links to manage it.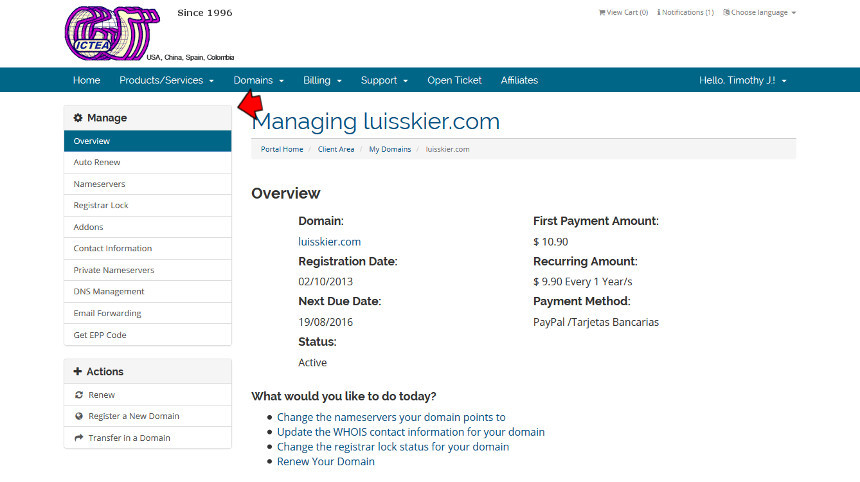
See a block to the left (Manage - Pointed by the arrow) with links to performed a series of actions on the domain. These actions are explained below.
5.2.1.- Auto-Renew.-
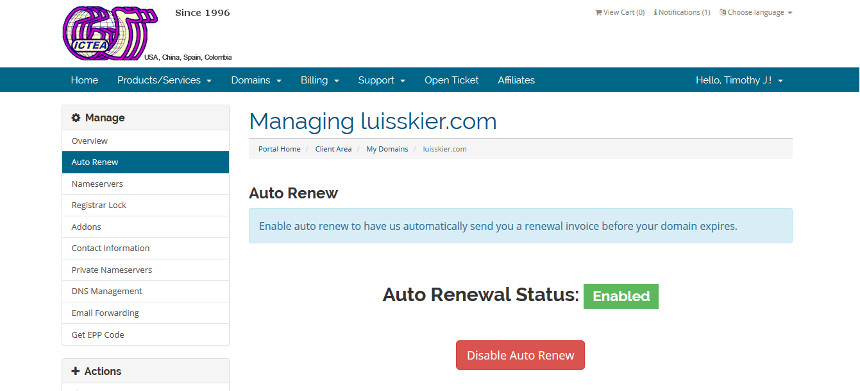
In the page 'Managing domain.com' click the link 'Auto Renew', a page (as shown below) appears allowing to enable/disable 'Auto Renew', that is, ICTEA will sent notices before the domain expires.
5.2.2.- Nameservers.-
Name servers are the names of the computers (servers) where your domain is. To read more about the name server system (DNSs), click HERE.
In the page 'Managing domain.com' click the link to the left 'Nameservers', a page (as shown below) appears allowing to enter the nameservers where you domain is.
By default, the box 'Use default nameservers' is ticked. That is, our nameservers are used so, your domain will be hosted by ICTEA.
But if your domain is going to be hosted in a server other than of 'ICTEA', then you should tick 'Use custom nameservers' and enter (up to five) their names instead of the ones shown: ns1.ictea.com y ns2.ictea.com (if you do not know the names, contact your web hosting company).
This is the same as indicated in 5.1.1.

5.2.3.- Register Lock.-
In the page 'Managing domain.com' click the link to the left 'Register Lock', a page (as shown below) appears, allowing to enable/disable the locking in the registrar to transfer the domain.
We recommend having the domain locked at the registrar, so to avoid a possible unwanted transfer.
This is the same as indicated in 5.1.3.

5.2.4.- Addons.-
We log in the 'Client Area' and we go to Domains >> My Domains and we click on the one you wish, or click in the drop-down menu which appears after clicking to the right of the icon resembling a wrench, for any domain.Or, in the first case, in the page which appears (Managing domain.com), click on the link to the left 'Addons'.
See also 5.1.
A page appears as the one shown below, where we can Buy/Manage/Enable/Disable the available addons.
The first (ID Protection) has an annual price but in the WHOIS database the registrar email address in spite of the real one a fictitious email address appears, so, the number of unsolicited emails decreases.
The following two are for free and if disabled a link to enable them will appear.
The second allows a DNS management as explained in 5.2.7.
The third allows an Email Forwarding management as explained in 5.2.8.

5.2.5.- Contact Information.-
Log in the 'Client Area' and go to Domains >> My Domains and click on the one you wish, or click in the drop-down menu which appears after clicking to the right of the icon resembling a wrench, for any domain.
Or, in the first case, in the page which appears (Managing domain.com), click on the link to the left 'Contact Information'.
A page appears with information of the contacts, 'Registrant', 'Administrative' and 'Technical', where you can modify any you wish.
This is the same as explained in 5.1.2.

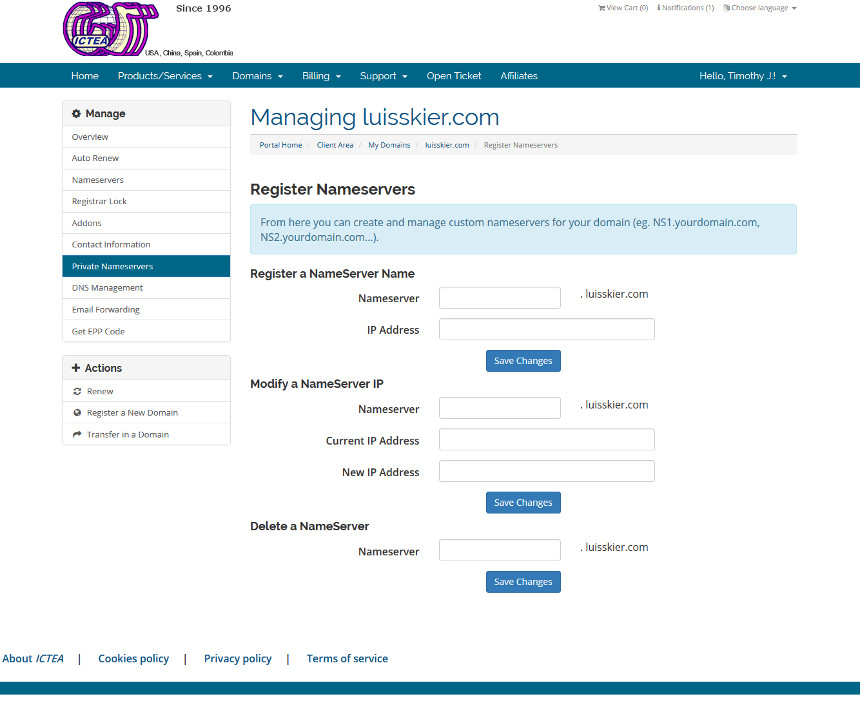
Log in the 'Client Area' and go to Domains >> My Domains and click on the one you wish. A page appears (Managing domain.com), then click on the link to the left 'Private Nameservers'.
A page, as shown below, appears where you can Register/Modify/Delete a nameserver for your domain.
To register a private nameserverw you should have two dedicated IP addresses in the server. So, you will assign each DNS record to a different IP address. For instance:
dns1.yourdomain.com -> 88.33.55.01
dns2.yourdomain.com -> 88.33.55.02
Certainly, this functionality is not required for the vast majority of customers of ICTEA, since we take care of the server are fully configured, so our customers only have to upload their sites and create their email addresses when they contract a hosting plan.
If you want your domain to forward to an existing website, do as follows:
Log in the 'Client Area' and go to Domains >> My Domains and click on the one you wish. A page appears (Managing domain.com), then click on the link to the left 'DNS Management'.
A page, as shown below, appears.
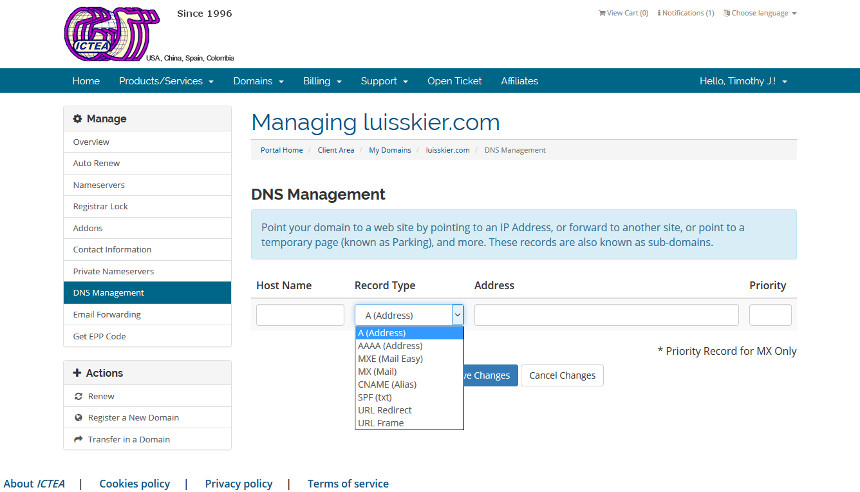
In this page, (which appears only showing three boxes but after pressing 'Save Changes' we will appear more if you need them), in the first (Host Name) enter www, if you want the forwanding happens when writting 'www.undominio.com', or better, enter '*' (asterisk) for the forwarding to happen with www or without www.
From the second drop-down menu (Record Type) select either, 'URL Redirect' or, 'URL Frame'.
What is the difference between 'URL Redirect' and 'URL Frame'.
'URL Redirect' is when we want in the address bar to appear the forwarded address, that is, when writting 'http://yourdomain.com' it changes to 'http://forwarded_domain.com'.
'URL Frame' is when the address does not change, that is, remains 'http://yourdomain.com'.
In the third box (Address) enter the web address you want to appear, that is, enter here 'http://forwarded_domain.com'.
We have explained how to redirect to an existing website, but there are options for other types of records. These are for advanced level, so, if you need help to manage your domain, contact us. We will be happy to help you. To contact us click HERE.
If you want an email address of your domain to forward to an email address of other domain, do as follows:
Log in the 'Client Area' and go to Domains >> My Domains and click on the one you wish. A page appears (Managing domain.com), then click on the link to the left 'Email Forwarding'.
A page, as shown below, appears.
In this page and in the first box enter the name of the email account to be forwarded, that is, in this example, 'info', belonging to the domain 'luisskier.com',that is, the email address then is 'info@luisskier.com' and in the second box enter the address where the mails should be sent, in this example to 'account@yourdomain.com'.
So, any mail sent to 'info@luisskier.com' will be redirected to 'account@yourdomain.com'.
5.2.9.- Get EPP Code.-
The EPP Code or Transfer Authorization Code is a code requested when transferring domains belonging to certain TLDs as .COM.
If you need the EPP Code, then log in the 'Client Area' and go to Domains >> My Domains and click on the one you wish. A page appears (Managing domain.com), then click on the link to the left 'Get EPP Code'.
A page, as shown below, appears. confirming the EPP code has been sent to the email address of the registrant.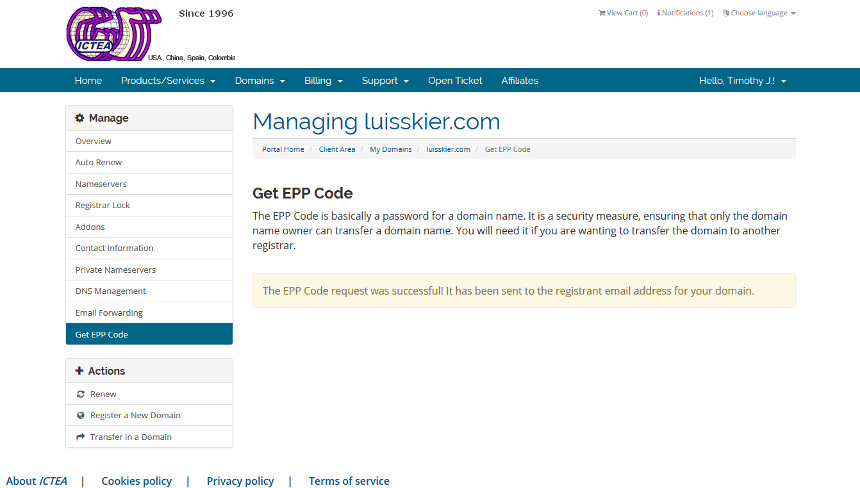
In this email address an email is received from the address 'dom@ictea.com', with the subject 'Requested authorization key for 'domain name'', containing the EPP code (a set of numbers, letters and characters, as pointed by the arrow in the image below) and telling that for security reasons the EPP code is updated periodically (so, use it as soon as possible).
- To read more about the transfer of a domain, click HERE.
- To read more about the EPP Codes, click HERE.
![]()
Above we have indicated various options for managing your domain, but if you want to do something and do not know how, contact us. We will be happy to help you.
To contact us click HERE.
![]()
6.- Billing.-
Click on the fourth item from the top menu (Billing), a drop-down menu will appear:

In this drop-down menu click on the first link (My Invoices), and a page appears showing a list with the invoices issued and their status.
Additional information is also shown.

Click on any paid invoice to show it, and then we can print it or download it.

Othewise, if the invoice is unpaid, a button allows to pay for it (as indicated by the arrow) and if you have credit a button allows to add credit to the invoice. Besides, you have the options to print it or download it.

In the top menu click on the fouth item from the top menu (Billing), a drop-down menu will appear. In this drop-down menu click on the second link (My Quotes), and a page appears showing a list of all quotations generated and additional information, as shown below:

Clicking on any already delivered but not accepted yet this shows with a button to accept it. Also two buttons at the bottom allows to print it or download it.

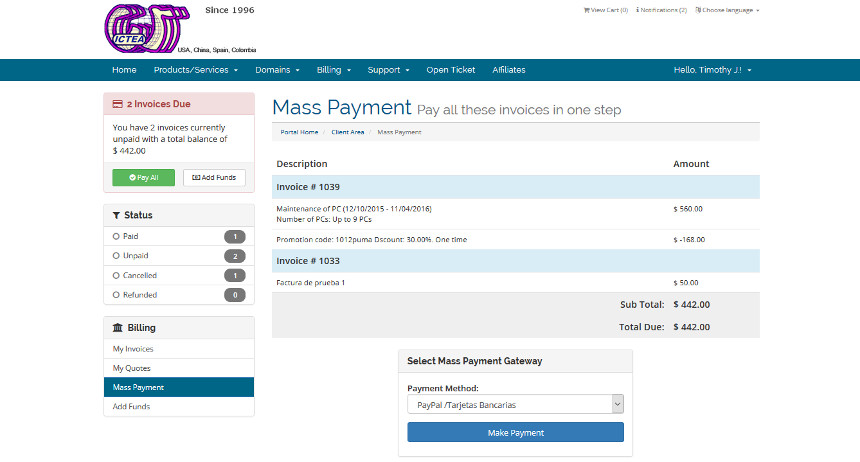
In the top menu click on the fouth item from the top menu (Billing), a drop-down menu will appear. In this drop-down menu click on the third link (Mass Payment) and a page appears allowing to pay for all pending invoices in a single transaction.
Click on the last option from the drop-down menu 'Billing' (Add Funds), and a page appears allowign to add credit to your account. From the account credit any invoice will be automatically paid, so there is no chance to lose any service for lack of payment.

You can see the credit in your account clicking on 'Notifications' (appearing on any page).


